Hello everyone!
I am breaking one of my own rules today by posting a straight up guide. I want to do this because
A.) There are not a lot of guides out there on this topic
and
B.) I feel like I may be able to explain it in a different manner, put my own lazy admin spin on it.
Before we go to far lets talk a little but about Windows 10 and the concept of Modern Managment.
Windows 10 has been built from the ground up to be managed as a mobile device. We are able to accomplish this with a few different protocols, which I myself and not really clear on all the details, but some of those are OMA-DM, SyncML, CSP's, and another OMA-Something,Something.
What this boils down to is anything that is not exposed through your MDMs GUI you will have to use what is called a 'custom policy' or 'custom profile' depending on your MDM solution. These are lines of pseudo code that you can input as SyncML, which to me looks very much like XML. Dont ask me the difference, I dont know. Im just the messenger here.
So, Microsoft maintains a list of all the CSPs you can configure here
https://docs.microsoft.com/en-us/windows/client-management/mdm/configuration-service-provider-reference
Most of these will map out to existing legacy GPO settings. There are 2 types of CSPs when you boil it down. Native CSPs and Policy Backed CSPs. It is important to note this because they are constructed differently. All of the Policy CSPs are under the Policy tab in that reference.
There is a third type of Custom Policy we can push out though, that is third party .ADMX policies. Everything in the above reference website are all first party options from Microsoft, very much built in policies.
What happens when you want to configure something like Google Chrome or even Microsofts own Office Suite? Well that is where .ADMX Ingestion comes into play.
Before we get into it let me tell you the basic idea of it. You start off by grabbing the actual .ADMX file for the GPOs you need. You then open up the .ADMX and copy the entire contents into a custom policy. Once this is done you can create another rule within that policy to configure the options contained within that .ADMX file. This will all become much clearer.....hopefully.
In this example we are going to modify an Outlook GPO that determines what authentication type we would use with Exchange. This is what the GPO looks like on the DC
As you can see it is not just a enabled/disabled option, it also has a drop down menu. Other GPOs may have a table, a custom value you have to put in, or any other number of options. Those are also all configured differently in our policy. This guide will show you how to do both those basic just enabled/disabled GPOs as well as drop down menu GPOs.
So now that we know the GPO that we want to carry over into Modern Managment we can open up the actual outlook.admx file and begin. The first step is to copy THE ENTIRE .ADMX into our custom policy.
To do this we want to go into our MDM and create a new custom policy. A custom policy can contain any number of SyncML entries. Our first entry is going to be the entire .ADMX. Lets give it the policy a name, i'm fond of just using the app name. We also need to tell it where to store this .ADMX file.
The OMA-URI should look like this ./Vendor/MSFT/Policy/ConfigOperations/ADMXInstall/{AppName}/{SettingType}/{AdmxFileName}.
OMA-URI IS ALWAYS CASE SENSITIVE!!!
In this URI the following variables should be provided:
AppName: This should be the name of the app that will be configured, but can theoretically be anything. In this example I’ll use Outlook16
SettingType: This should always be policy with ingesting ADMX-files. So, in this example I’ll use Policy
AdmxFileName: This should be the name of the ADMX-file, but can theoretically be anything. In this example I’ll use outlk16
So the completed string would look like this
./Vendor/MSFT/Policy/ConfigOperations/ADMXInstall/Outlook16/Policy/outlk16
You need to remember the choices you have made here in the name, as it will need to be referenced in your setting config.
For Data type choose String and for Value copy and paste the whole .ADMX file. I like to open the .ADMX in notepad++ and then format it as XML. Then use ctrl+a to select all and ctrl+c to copy it. Then just paste it into your Intune console.
Here is a pic of my completed setting
Once this is completed we now the ability to configure any setting contained withing the ADMX file. For our setting we want to hit the blue add button in our custom policy again and give it an appropriate name and description. Now the hard part starts. For OMA-URI we have to craft a specific string that traces back the parent categories. In order to do this we need to go back into our Notepad++ and do a search for a term that would find our specific setting in this XML mess. I searched for Kerberos. In the screenshot below all of the highlighted text is our 1 policy setting we need to configure.
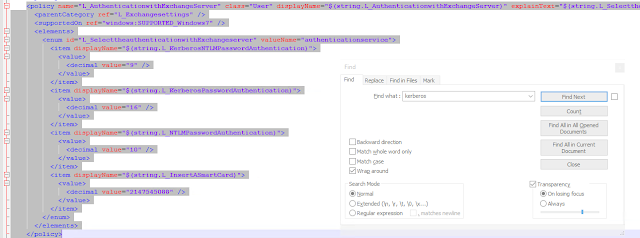
At the top of every .ADMX file the first section are all of the parent categories. We need to find these and write these down in notepad. We can see in our highlighted text above that for our setting its parent category is "L_Exchangesettings" if we do a ctrl+f and search the document top down we will find it in the top of the document with a reference to IT'S parent category, we then do a ctrl+f and find that one, that one may also have a parent category, so on and so forth. When you come to the final category its parent will be itself, you will know you are done with this step then. See the screenshot for more detail.
Now to create our OMA-URI string we need to create it like the following
The OMA-URI should look like this ./{User or Device}/Vendor/MSFT/Policy/Config/{AppName}~Policy~{CategoryPathFromADMX}/{SettingFromADMX}
REMEMBER CASE SENSITIVE! USE THE SAME CASE AS THE GPO USES!!!!
User or Device - Here what you would use depends on the GPO, is it a computer setting or user setting. In our example we will be using User
Appname - This is the same name from our previous ingestion file, we just need to reference where we put it, so for our example we will use Outlook16
Policy - This is literally the word Policy
CategoryPath - This is our path we copied down in notepad starting with the top level parent L_MicrosoftOfficeOutlook and going all the way down to the first "parent catagory" in the admx file which would be L_Exchangesettings with the tilda ~ between each category
SettingFromADMX - This is our actual "policy name" from the screen shot above which is L_AuthenticationwithExchangeServer
So, in all of its glory, for our example the OMA-URI would be (things in bold are things that are not static and things we have configured)
./User/vendor/MSFT/Policy/Config/Outlook16~Policy~L_MicrosoftOfficeOutlook~L_ToolsAccounts~L_Exchangesettings/L_AuthenticationwithExchangeServer
So in this OMA-URI we have said where the policy is that we want to flip on and off. The next piece is changing the actual values. The next option you will see with Intune is the Data Type box, set this to String. Then in the actual value box we want to put in the following
<enabled/> <dataid="L_SelecttheauthenticationwithExchangeServer" value="9"/>
Let me explain what these are doing, the first piece is obviously turning the policy on.If this was just an on or off policy we could stop here, but this is a multi valued policy.
The second piece, well, the best way to think of this is the name of the drop down box. This is the Enum id from the admx screenshot above. L_SelecttheauthenticationwithExchangeServer
The value="9" part is what sets the policy to allow either NTLM or Kerberos auth. We can tell this because of the display name right above it gives us a small description of what that number means. If we only wanted to say allow smart card authentication we would have done value="2147545088"
The completed setting looks like the below image.
If you are having trouble getting this policy to apply you need to triple check your syntax. Some common things I have seen are weird quotation marks when copying and pasting from Notepad++, these policies are also case sensitive, and for this particular policy I could not get it to apply until the device actually had an Outlook profile on it.
In order to see if your policy has applied you can check 3 places.
In the Intune console, under device configuration>policy>device status
On the machine itself under settings>account>work or school>info
You can also check the registry on that same machine. Remember we are just fundamentally setting registry keys.
I hope this can help some of you make the jump from the legacy style of management into the not as developed, but way more mobile and growing modern management style.
Thanks for stopping by! Drop a comment below if you have any questions!


